
Melty S’mores Bars in a Skillet aren’t just a dessert they’re a story baked in chocolate and marshmallows. When I think back to childhood, I remember late nights in the kitchen with the warm scent of cinnamon drifting through the air. My mother always said, “Cooking is about what you put into the heart,” and this skillet treat feels like that lesson in every bite. It’s gooey, rich, and endlessly comforting. Whether you’re hosting friends or simply craving something sweet, this recipe turns an ordinary evening into a moment of joy no campfire required, just love and a skillet.
Table of Contents
Table of Contents
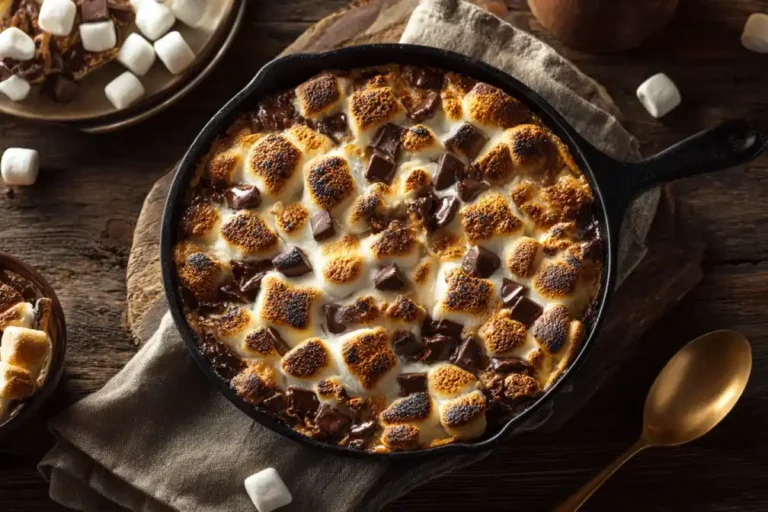
Melty S’mores Bars in a Skillet: A Campfire Classic Brought Indoors
A gooey, golden dessert made with graham cracker crust, chocolate, and marshmallows baked in a skillet for the perfect indoor campfire treat.
- Total Time: 28 minutes
- Yield: 12 bars
Ingredients
2 cups graham cracker crumbs
1/2 cup unsalted butter, melted
1/4 cup brown sugar
3 cups mini marshmallows, divided
1 1/2 cups milk chocolate chips
1 teaspoon vanilla extract
Pinch of salt
Instructions
Preheat oven to 350°F and lightly grease a 10–12 inch oven-safe skillet.
Mix graham cracker crumbs, melted butter, and brown sugar until combined.
Press the mixture firmly into the skillet to form an even crust.
Sprinkle chocolate chips evenly over the crust.
Add 2 1/2 cups of mini marshmallows on top, reserving the rest for garnish.
Bake for 15–18 minutes until marshmallows puff.
Switch oven to broil and toast marshmallows for 1–2 minutes until golden.
Remove from oven, let cool for 10 minutes, and sprinkle the reserved marshmallows on top.
Slice into bars or serve straight from the skillet.
Notes
Use semi-sweet or dark chocolate for a richer flavor.
Add chopped pecans, caramel drizzle, or peanut butter cups for variations.
For neat slices, let bars cool completely before cutting.
- Prep Time: 10 minutes
- Cook Time: 18 minutes
- Category: Dessert
- Method: Baking
- Cuisine: American
Gathering the Ingredients for Melty S’mores Bars in a Skillet
The beauty of Melty S’mores Bars in a Skillet lies in their simplicity. You don’t need anything fancy, just a handful of pantry staples that come together in one skillet. Think of it as the grown-up cousin of campfire s’mores, with the convenience of baking right at home.
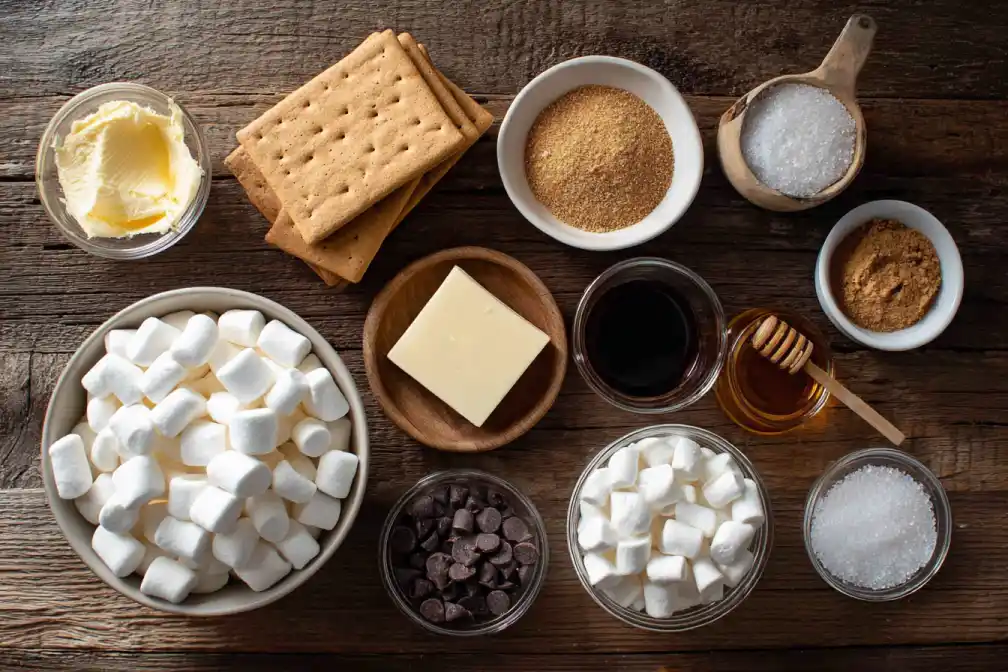
Pantry Staples You’ll Need
Start with graham crackers the golden base of any s’more. Crush them into fine crumbs for that buttery crust. Next, grab unsalted butter, which binds everything together and adds richness. Of course, no s’mores bar is complete without mini marshmallows and milk chocolate chips. For extra decadence, consider mixing in a handful of dark chocolate chunks or even peanut butter cups.
Here’s a quick reference table for your shopping list:
| Ingredient | Amount | Notes |
|---|---|---|
| Graham cracker crumbs | 2 cups | About 15 full crackers |
| Unsalted butter | 1/2 cup (melted) | Adds richness and moisture |
| Brown sugar | 1/4 cup | Sweetens the crust |
| Mini marshmallows | 3 cups | Save some for topping |
| Milk chocolate chips | 1 1/2 cups | Semi-sweet works too |
| Vanilla extract | 1 teaspoon | Enhances flavor |
| Pinch of salt | To taste | Balances the sweetness |
Flavorful Twists
If you’re a fan of indulgent desserts like gooey banana chocolate bars, you’ll love experimenting with add-ins here. Swap the chocolate chips for chunks of Reese’s Cheesecake Delight style peanut butter cups, or drizzle caramel over the top for a salty-sweet surprise. You can even borrow inspiration from pecan pie brownies by adding chopped pecans for crunch.
The ingredients list is short, but it’s flexible enough to make every skillet s’mores bar your own. That’s the beauty of this recipe: it’s forgiving, fun, and full of opportunities to create something memorable.
How to Make Melty S’mores Bars in a Skillet
Making Melty S’mores Bars in a Skillet is as simple as layering, melting, and letting the oven work its magic. The key is balance—you want that golden graham base, a gooey marshmallow center, and just enough chocolate to make every bite indulgent without overpowering.
Step 1: Build the Crust
Start by preheating your oven to 350°F. While it warms, combine your graham cracker crumbs, melted butter, and brown sugar in a mixing bowl. Stir until the crumbs resemble wet sand. Press this mixture firmly into the bottom of a 10- or 12-inch oven-safe skillet. This crust is what gives the bars structure, so don’t skip pressing it down evenly.
Step 2: Layer the Goodness
Next comes the fun part. Sprinkle a generous layer of milk chocolate chips over the crust. Follow with mini marshmallows, reserving a handful for topping later. If you want an extra decadent twist, mix in add-ins inspired by desserts like fried strawberry cheesecake sandwiches or even drizzle peanut butter across the marshmallows.
Step 3: Bake and Broil
Slide the skillet into the oven and bake for about 15–18 minutes, until the marshmallows begin to puff. Then, switch your oven to broil for 1–2 minutes to achieve that toasted, campfire-like finish. Keep a close eye on it marshmallows can go from golden to burnt in seconds.
Step 4: Cool and Cut
Let the skillet rest for at least 10 minutes before slicing. The cooling allows the layers to set while still staying soft and melty. Cut into squares or serve straight from the skillet with spoons for a communal treat.
With just four easy steps, you’ll have a dessert that feels nostalgic yet elevated, perfect for family nights or weekend gatherings.
Serving and Garnishing Melty S’mores Bars in a Skillet
One of the best parts of Melty S’mores Bars in a Skillet is the presentation. They look rustic yet indulgent, making them just as suited for a casual family night as they are for a festive gathering.
Serving Straight from the Skillet
There’s something cozy about bringing the skillet right to the table. Place it on a wooden board or trivet, grab spoons, and let everyone dig in. The marshmallows stay soft, the chocolate remains melty, and the crust provides just enough crunch. This style of serving feels similar to the communal joy of Easter egg sugar cookie bars, where sharing is part of the fun.
If you’d prefer a more polished look, let the bars cool completely before cutting them into neat squares. A sharp knife or pizza cutter works best. Serve them on a platter with a dusting of powdered sugar for a bakery-style touch.
Garnishing for Extra Flavor
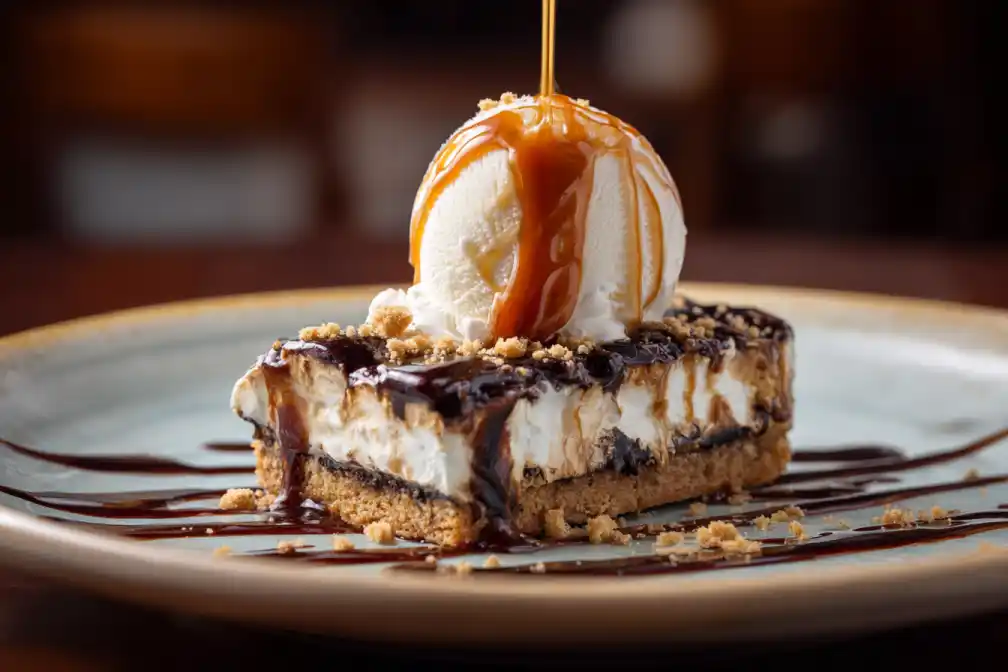
While the bars are irresistible on their own, a few garnishes can take them to the next level. Try topping with:
- Caramel drizzle for a salty-sweet contrast.
- Crushed nuts like pecans or almonds for crunch, inspired by rich desserts such as pecan pie brownies.
- Fruit toppings like fresh raspberries, which balance the sweetness and give a pop of color.
For a fun twist, add a scoop of vanilla ice cream right on top of the warm skillet. The heat from the bars melts the ice cream into the layers, creating an indulgent experience similar to Reese’s Cheesecake Delight.
Whether served family-style or plated individually, these skillet s’mores bars offer endless ways to impress. Each bite feels nostalgic yet dressed up, making them a true showstopper at any table.
Common Mistakes to Avoid and How to Store Melty S’mores Bars in a Skillet
Even simple recipes have their pitfalls, and Melty S’mores Bars in a Skillet are no exception. By keeping an eye on a few common mistakes, you can guarantee gooey success every time.
Mistakes to Watch Out For
The first mistake is pressing the graham cracker crust too lightly. Without a firm base, the bars fall apart when sliced. Be sure to press down evenly until it feels compact. Another issue is overbaking. Marshmallows toast quickly, and leaving them under the broiler even a minute too long can turn golden perfection into burnt disappointment. Watch them closely at the end.
Layering too much chocolate or too many marshmallows is another trap. It might sound tempting, but balance is key. Too much filling causes the bars to bubble over or become overly sticky. Keep your layers generous but manageable. Finally, always let the skillet cool before cutting. Rushing this step results in a messy heap rather than clean, satisfying squares.
Storage and Reheating Tips
If you happen to have leftovers, storage is simple. Let the bars cool completely before transferring them to an airtight container. They keep at room temperature for up to two days or in the fridge for up to five. To reheat, place a slice in the microwave for 10–15 seconds or warm the skillet gently in the oven. The marshmallows will soften, and the chocolate will melt just enough to bring back that fresh-baked texture.
For inspiration on storage-friendly desserts, take cues from recipes like gooey banana chocolate bars, which also keep well and taste even better the next day. A little planning ensures your skillet s’mores remain just as irresistible tomorrow as they are today.
Conclusion
Melty S’mores Bars in a Skillet are proof that the simplest ingredients can create the sweetest memories. With a buttery graham cracker crust, melty chocolate, and gooey marshmallows, this dessert brings the joy of campfire s’mores straight to your kitchen. The best part? It’s easy, fun, and endlessly adaptable. Whether you’re serving straight from the skillet for a cozy night in or plating neatly cut bars for a party, this recipe delivers comfort in every bite. Just remember: balance your layers, watch the broil, and take time to let it cool before serving. Sweet success is guaranteed.
Looking for more sweet inspiration?
👉 Follow along on Facebook and Instagram” for even more easy, cozy recipes made with love.
FAQs about Melty S’mores Bars in a Skillet
Can you make s’mores bars without an oven?
Yes! You can prepare them on a stovetop skillet over low heat or even in an air fryer. The oven gives a perfectly toasted finish, but alternative methods still create gooey results.
How do you keep s’mores bars from getting too hard?
Don’t overbake. Remove them as soon as marshmallows puff and toast lightly. Cooling for 10 minutes helps them set while staying soft.
What type of skillet works best for baking dessert bars?
A cast iron skillet is ideal because it distributes heat evenly and holds warmth. However, any oven-safe skillet will do the job.
Can I prepare s’mores bars ahead of time?
Yes, but they’re best enjoyed fresh. If making ahead, bake as directed, cool completely, and store in an airtight container. Reheat briefly in the oven or microwave before serving.